![]()
![]()
![]() Buy. Download. Create. Get Photoshop CS4 now at the Adobe Store.
Buy. Download. Create. Get Photoshop CS4 now at the Adobe Store.
![]() Try before you buy. Download any Adobe product for a free 30 day trial.
Try before you buy. Download any Adobe product for a free 30 day trial.
![]()
 Mark Galer is currently a senior lecturer in Digital Imaging at RMIT University on the BA Photography program (the leading commercial course in Australia) and has published 6 titles for the International publisher Focal Press - ranging from location photography through to Digital Imaging and Photoshop skills.
He has a commercial background in editorial photography (travel/landscape) and is currently a regular contributor to magazines in the USA, Australia and the UK. He is an Adobe beta tester for Photoshop, Bridge and Photoshop Elements, is one of the leading educators in Photoshop training and has recently been appointed as an Adobe Ambassador for Photoshop training in Australia. For more info visit his site. We'll also just posted an in-depth interview with Mark.
![]()
![]() How To Sharpen An Image In Photoshop — Advanced Sharpening Techniques
How To Sharpen An Image In Photoshop — Advanced Sharpening Techniques
 Most if not all digital images require sharpening, even if shot on a state of the art digital megaresolution SLR with pin-sharp focusing. Most cameras or scanners can sharpen as the image is captured but the highest quality sharpening is to be found in the image editing software.
The best sharpening techniques are those that prioritize the important areas for sharpening and leave the smoother areas of the image well alone, e.g. sharpening the eyes of a portrait but avoiding the skin texture. These advanced techniques are essential when sharpening images that have been scanned from film or have excessive noise, neither of which needs accentuating by the Unsharp Mask. So let the project begin.
![]() Selecting & Extracting Hair - Masking Tutorial - Extraction Tips
Selecting & Extracting Hair - Masking Tutorial - Extraction Tips
 One of the most challenging montage or masking jobs in the profession of post-production editing is the hair lift. Get it wrong and, just like a bad wig, it shows. The first secret step must be completed before you even press the shutter on the camera. Your number one essential step for success is to first shoot your model against a white backdrop, sufficiently illuminated so that it is captured as white rather than gray.
The post-production is the easy bit - simply apply the correct sequence of editing steps and the magic is all yours. This is not brain surgery — but follow these simple steps and you will join the elite ranks of Photoshop gurus around the world. Celebrity status is just a few clicks away.
![]() Use The Displace Filter & Displacement Maps To Make A Realistic Flag
Use The Displace Filter & Displacement Maps To Make A Realistic Flag
 By using the blend modes the flag in this project can be modified to respect the color and tonality of the undulating silk beneath it. The highlights and shadows that give the silk its shape can however be further utilized to wrap or bend the flag so that it obeys the material’s shape and sense of volume.
This can be achieved by using the Displace filter in conjunction with a ‘displacement map’. The ‘map’ defines the contours to which the flag must conform. The final effect can be likened to ‘shrink-wrapping’ the flag to the 3-D form of the undulating silk.
![]() Photoshop Masking & Montage Tutorial — Using Masks To Improve Landscape Images
Photoshop Masking & Montage Tutorial — Using Masks To Improve Landscape Images
 In this sample chapter from his new book, Photoshop CS3 Essential Skills, Mark Galer shows you Photoshop techniques that use selections and Photoshop masks to create amazing effects that can be applied to landscape images. As a bonus, you can also download high resolution versions of the images that are used in the tutorial, so you can work along with Mark.
This tutorial is an excellent way to become more familiar with Photoshop's powerful masking and selection tools.
![]() Working With Photomerge In Photoshop Elements 6 For Windows
Working With Photomerge In Photoshop Elements 6 For Windows
 They say that sequels are never as good as the original - try telling that to Adobe. There fully revamped Photomerge now comes in three flavors and is ‘fully fantastic’. You get to explore the greatly improved Photomerge features only in Elements 6 and Photoshop CS3. Photomerge is now capable of aligning and blending images without any signs of struggle - banding in smooth areas of tone.
The fully revised Photomerge feature first made its appearance with CS3 but the maths seems to have got even better with the release of Elements 6 and the stitching is so clever it will really have you amazed at the quality that can be achieved inside this budget program.
![]() Creating Selections With Photoshop's Pen Tool
Creating Selections With Photoshop's Pen Tool
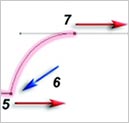 The Pen Tool is often used in the creation of sophisticated smooth-edged selections, but strictly speaking it is not one of the selection tools. The Pen Tool creates vector paths instead of selections; these, however, can be converted into selections that in turn can be used to extract or mask groups of pixels.
Although graphic designers are quite adept at using this tool, many photographers the world over have been furiously waving magic wands and magnetic lassos at the megapixel army and putting graphics tablets on their shopping lists each year in an attempt to avoid recognizing the contribution that this unique tool has to offer.
![]()
![]() Adobe Photoshop Lightroom - Who Needs It?
Adobe Photoshop Lightroom - Who Needs It?
If you have managed to live without Photoshop Lightroom up until now, what makes it so fantabulous/damned hot that you need to place it at the top of your software wish list?
Photoshop Lightroom has had somewhat of an identity crisis amongst the general population of photographers since its release in early 2007. The Adobe engineers built it to fill a gap in the Photoshop family of products (Photoshop CS3 and Photoshop Elements being the other two family members) but many amongst the photographic community have not been able to identify its primary task to make it the ‘must have’ product that Adobe hoped it would become for all digital photographers.
![]() Working With Adjustment Layers In Elements 6
Working With Adjustment Layers In Elements 6
 One of the most important image adjustment features in a professional photographer’s workflow is Curves (a sort of Levels command on steroids). Color Curves has now made a welcome appearance in the Enhance menu in Photoshop Elements but it is still not available as an adjustment layer.
This project shows you several ways to control contrast using adjustment layers to increase your post-production editing power to maximum performance.
![]() Adjusting Exposure in Adobe Camera Raw CS3
Adjusting Exposure in Adobe Camera Raw CS3
 For those digital photographers interested in the dark side, an old SLR loaded with a fine-grain black and white film is a hard act to follow. The liquid smooth transitions and black velvet-like quality of dark low-key prints of yesteryear is something that digital capture is hard pressed to match.
The typical DSLR camera is, however, a pessimist when it comes to clipped highlights and ignorant of what is possible in Adobe Camera Raw. Adobe Camera Raw can recover at least one stop of extra highlight information when the Exposure slider is dragged to the left (so long as the photographer has used a DSLR camera that has a broader dynamic range than your typical fixed lens compact digicam).
![]() Working With Shadows In Photoshop - Advanced Shadow Techniques
Working With Shadows In Photoshop - Advanced Shadow Techniques
 Learn the fine art of isolating and preserving delicate and complex shadows for transplantation to exotic new backgrounds. This tutorial reveals how to introduce a world of exciting textures to your ever so subtle... not... studio tabletop.
The flower for this tutorial was photographed (using a Fuji FinePix) on a cold winters morning in Victoria whilst the sand (shot on Kodachrome film) hails from the Great Indian Desert in Rajasthan. Unlikely bedfellows, but with a little craft the two can lie together comfortably within the same frame – but only if the subtle shadow is captured with all of its subtlety and delicately transplanted to its new home in the desert. This is how...!
![]() Photoshop CS3 Tutorial High Dynamic Range
Photoshop CS3 Tutorial High Dynamic Range
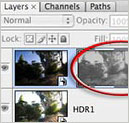 Contrary to popular opinion – what you see is not what you always get. You may be able to see the detail in those dark shadows and bright highlights when the sun is shining – but can your CCD or CMOS sensor? Contrast in a scene is often a photographer’s worst enemy. Contrast is a sneak thief that steals away the detail in the highlights or shadows (sometimes both).
Photoshop’s Merge to HDR (High Dynamic Range) automated feature has been improved for CS3, but it is still not able to merge exposures where subjects have moved between the separate exposures. The technique in this tutorial (taken from the new Photoshop CS3: Essential Skills book) shows you how to resolve this problem. This technique also offers superior midtone contrast than Photoshop’s merge to HDR automated feature.
![]() Adobe Photoshop CS3 Public Beta - A Photographer’s Perspective
Adobe Photoshop CS3 Public Beta - A Photographer’s Perspective
![]() Unless you have been hiding in a cupboard somewhere high in the Andes you have probably heard by now that Adobe has released a public beta of Photoshop CS3. As a beta tester (prior to this pubic release) I have been working with this software for some time now and would strongly recommend that you download this beta before Photoshop CS3 goes on sale.
Unless you have been hiding in a cupboard somewhere high in the Andes you have probably heard by now that Adobe has released a public beta of Photoshop CS3. As a beta tester (prior to this pubic release) I have been working with this software for some time now and would strongly recommend that you download this beta before Photoshop CS3 goes on sale.
For G4 Mac laptop owners, and for those Mac users who have invested in the new Mac hardware sporting the new Intel chips, this public beta is your Christmas present from Adobe. Even if we stop talking about the new features that this public beta offers, the software delivers the speed you have probably been yearning for now.
![]() Adopting A Photoshop Lightroom Workflow - Lightroom Tutorial
Adopting A Photoshop Lightroom Workflow - Lightroom Tutorial
If you are a photographer who wants to take a laptop on location to review your work-in-progress, here are the four essential steps that you need to take to ensure you stay organized when using Adobe Photoshop Lightroom. This workflow is optimized for a photographer who owns:
- A laptop computer.
- An external large-capacity hard drive or studio/home-office desktop computer with a large hard-drive capacity.
- A smaller pocket drive that can be powered via the USB or Firewire port off the laptop computer. Some photographers may prefer to burn DVDs using their laptop instead of using a USB/Firewire pocket drive.
The four steps in the workflow are as follows:
- Create a master Lightroom catalog.
- Import images on location into a working catalog using a laptop computer.
- Export the working catalog to your USB/Firewire pocket drive or burn the catalog to a DVD.
- Import the catalog from the location shoot into the master catalog and transfer the images to the main hard drive.
Download the Adopting A Photoshop Lightroom Workflow PDF (660KB).
Photoshop Elements 7 Tutorial - Smart Brushes And The Action Player
Here is a sample tutorial from the new book from Mark Galer, Adobe Photoshop Elements 7 Maximum Performance (available in December). In this tutorial you will see how to use the new Smart Brushes and the Action Player in Photoshop Elements 7. (Download the tutorial - PDF - 1.8MB)
Digital Basics 101 — The Seven Steps — Tips For Working In Photoshop
 Here are some Frequently Asked Questions from photographers who are new to Photoshop. In response, Mark Galer offers professional tips and advice for Photoshop beginners.
The answers have been arranged in order to follow the typical editing workflow in Photoshop.
Working With Photoshop Preferences
OK, Mark, I figured out how to get the CD into my computer and load the program. But what about the preferences? Yikes, I’m already lost!
The great thing about Photoshop is that it comes ready to use. Don’t get hung up on trying to make decisions about all of those settings until you have been using the software for a couple of months. Nothing is going to get screwed up in the first instance just because you forgot to check the ‘beep when done’ preference.
Working With Photoshop Color Spaces
My friends keep talking about the color space they are using. I just nod my head and pretend I know what they are talking about. What is it and what do you recommend?
Space is about size. Think of color space as a box of colored pencils. sRGB is the small box of colored pencils and Adobe RGB is the medium sized box of colored pencils (not many people have need for the ‘supersize-me’ box of colored pencils called ProPhoto). Small may not sound so great but the computer monitor you are now looking at probably can’t display the extra colors that can be found in the larger box (Adobe RGB). These colors come in to play if you use an inkjet printer or a better quality photographic lab (print service provider).
Photo Optimization Tips
How do I quickly fix an image to look better?
Some people have turned editing images into a science and an art form all rolled into one, but it is possible to get some good results by just hitting a few buttons that have the word ‘Auto’ written on them. Most digital images will benefit from a couple of simple ‘quick fixes’ to optimise the color and contrast. The camera may have done a reasonable job but the chances are that Photoshop will be able to further improve the image (well that’s why you purchased the software right). If you are new to digital image-editing then Photoshop will complete these steps automatically with just a click of the mouse and do a pretty good job pretty much most of the time. Just duplicate the original image first (just in case you make a pig’s ear out of things and want to start again).
How To Crop An Image In Photoshop
How do I crop an image?
Before I tell you how, I should really answer why. With most photographers capturing images in excess of 8-Megapixels you have way more pixels than you need for most ‘normal’ everyday uses. Uploading an 8-megapixel image to an online gallery or eBay is overkill (there are only 2-megapixels on a full HD widescreen TV!). The second reason you should crop an image is ensure that it is the correct shape (there is no use giving somebody an oblong image if their one and only photo frame is square). The third reason you should crop is to improve the composition (which is another way of saying that it is a good idea to get rid of all of the uninteresting or distracting parts of the image that you don’t want people to see). You can enhance or improve the image by just cutting, or cropping, the unwanted parts of the image off. This will make people think you are a much better photographer than you really are!
Image Resolution Tips
What is resolution and which one is right?
The issue of resolution can sometimes get confusing because the same word is often applied to different aspects of photography. Imagine, for a moment, that the word ‘Device’ was the name for a camera, a computer screen and a printer. If you were having a conversation with a friend and were discussing a photographic workflow from capture to print, imagine the confusion that could occur (“which device called device are you now referring to?”). This is what currently happens when some people talk about resolution but don’t have a good understanding of when and how to use the word appropriately or clarify what they are referring to. When you talk about resolution you have to add a second word before or after the word resolution, e.g. optical resolution (of your lens), image resolution (the file), monitor resolution, printer resolution etc.
Tips For Saving Images In Photoshop
Now that I have edited my image I want to save it but there are so many options – which do you recommend?
If you open your original file, change something and then hit the ‘Save’ command in the ‘File’ menu you run the risk of writing over your original file – which is not a good idea. In a year’s time you could be editing like a professional and regret the work you carried out on the image you are working on now. It’s always good to know that the original can be edited again at some point in the future.
All About Monitor Calibration And Printing
My prints look different to the images on my screen – why?
Your monitor is only accurate if you have calibrated it using a monitor calibrator. These are relatively inexpensive devices now and are easy to use. Companies such as Gretag-Macbeth and datacolor make inexpensive units that will enable you to make sure that the colors captured by your camera are displayed accurately on your screen. When you adjust the image colors on a calibrated screen you will be confident that it actually needs adjusting. A good print service provider should now be able to provide you with prints that are very similar to the images that appear on your screen.
![]()
Photoshop CS4 & Photoshop CS4 Extended - Best Deals From Adobe
 Photoshop CS4 and Photoshop CS4 Extended feature a newly refined, tab-based interface in a single, integrated window, with self-adjusting panels arranged in docked groups. Automatically keeping tools well organized and away from your work area means you get greater efficiency, less clutter, and better results, faster than before.
Delivering all the features of Adobe Photoshop CS4 software, including the new Adjustments and Masks panels, Adobe Photoshop CS4 Extended also provides breakthrough 3D editing and compositing power to paint directly on 3D models, create 3D animations, convert 2D images to 3D objects, and more; richer motion graphics editing; and more powerful and flexible image analysis and tracking. Learn more on our Photoshop CS4 Tutorials Page. To download the free trial, see details on our Photoshop CS4 Free Trial Download Page.
Find upgrade options and package deals at the Adobe USA Store. Teachers and students get special pricing at the Adobe Education Store. You can also buy in your country currency and language at the following Adobe International Stores:
Adobe United Kingdom | Adobe Germany | Adobe France | Adobe Eastern Europe![]()
![]()
Photoshop CS4 Book - Photoshop CS4 Essential Skills - By Mark Galer And Philip Andrews
 Brimming with beautiful pictures, Photoshop CS4 Essential Skills guides you through a project-based, progressive curriculum so that you can build all the essential skills to enhance photographs creatively and professionally with Photoshop CS4. If you are an aspiring professional or a student learning photography, digital imaging, or design graphics, you'll be amazed at the stunning results you can achieve. A DVD is included free.
The Essential Skills Photography Series from Focal Press uniquely offers a structured learning experience for photographers of all ages, with both the underlying theory and loads of invaluable 'how to' and real-life practice projects - all from the most talented photography practitioners/educators in the world.
Read 2 free sample chapters:
• Skin Retouching Tips In Photoshop CS4
• Transforming Smart Objects In Photoshop CS4
• Find more Photoshop CS4 tutorials on our Photoshop CS4 Tutorials Page.
Find More Adobe Photoshop Books at Amazon.com
Find all the latest bestselling Photoshop books at discount prices at Amazon.com.![]()
Photoshop Elements 7.0 Maximum Performance.
Unleash the hidden potential for professional image editing in Adobe Photoshop Elements with Photoshop Elements 7.0 Maximum Performance, a project-based, real-world guide.
 Using step-by-step instructions and accompanying movie tutorials, Mark Galer leads you through the less well-known and most powerful post-production editing techniques Adobe Photoshop Elements has to offer. Cunning tricks and clever workarounds in this book show you how to create inspiring, professional-looking images and perform tasks you only thought possible in the full Adobe Photoshop package.
Whether you’re an imaging professional or a photography enthusiast, this book will help you get the maximum performance from your software. Learn how to:
- Create striking effects with no commercial lighting or studio equipment
- Extend the dynamic range of your digital camera by merging multiple exposures
- Optimize, enhance and montage images with stunning results
Mark Galer is a freelance photographer, accomplished lecturer and best-selling author of number books on photography. He is an official Adobe Ambassador for Adobe Photoshop and Adobe Photoshop Elements.
Exclusive Special Offer - Fluid Mask 3.0
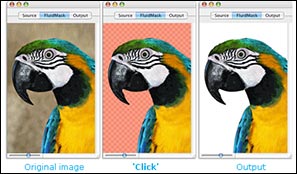 Fluid Mask 3.0 is based on breakthrough segmentation technology inspired by the way the eye, optic nerve and brain perform visual processing. When an image is loaded, Fluid Mask's segmentation engine analyses the distribution of colors, finding the natural groups within the image. Together with information calculated about edges, gradients and textures, a model is constructed which divides the images into objects.
Vertus Software is offering Fluid Mask at a special 'friends and partner' discounted rate.
This is an exclusive offer to visitors of PhotoshopSupport.com. To qualify, visit the Fluid Mask Discount Price page. Find out more about Fluid Mask on our special Fluid Mask Page.
Exclusive 20% Discount On Select Total Training Products & Bundles
 To redeem our exclusive discount coupon, use promotion code save20pss in your shopping cart. You could save hundreds of dollars. Use this special link to see the full offer.
Total Training for Adobe Photoshop
Learn Adobe Photoshop with 21 hours of interactive Adobe Photoshop tutorials. This is training for real-world situations and includes additional tips and techniques used by the pros.
Regular Price: $299.99 (take 20% off with coupon)
SiteGrinder 2 — Photoshop Plugin
 There often seems to be a strict division of labor within the world of web design and development. Creative professionals tend to stick to the Photoshop domain, while those well-versed in scripting are left to the task of implementing their work. Indeed, the two realms are quite different from each other, to which any of us even vaguely familiar with either can easily attest.
Essentially, Photoshop is a no-holds-barred design studio, offering the artist a seemingly endless array of creative options. On the other hand, HTML, CSS, Java and the like follow strict rules of engagement, requiring the developer to take any number of esoteric concerns into consideration in order to ensure that designs are properly displayed on the web.
Turn Photoshop Into A Complete Web Design Tool
SiteGrinder 2 seeks to bridge this gap between design and development. Basically, this program turns Photoshop into an easy-to-use and fully functional web design tool. With SiteGrinder 2, designers will now have the freedom to totally let their creativity loose and then, without skipping a beat, transfer their designs to the web. Bringing esthetic concerns together with more practical considerations, this program is an amazingly powerful tool that would make a fantastic addition to any web designer's bag of tricks.
 Generate Your Web Pages Directly From Photoshop
By generating web pages directly from Photoshop, you'll be able to spend much more time on the creative end of the spectrum, since you'll know right off the bat how well particular designs will translate to the web. No more going back to the Photoshop drawing board after getting a phone call from your development team, telling you that what you had envisioned doesn't have a chance of being displayed on the web. You can immediately visually and interactively test your designs, which permits you to then make changes to either esthetics or functions while it's still relatively early on in the design process.


No comments:
Post a Comment